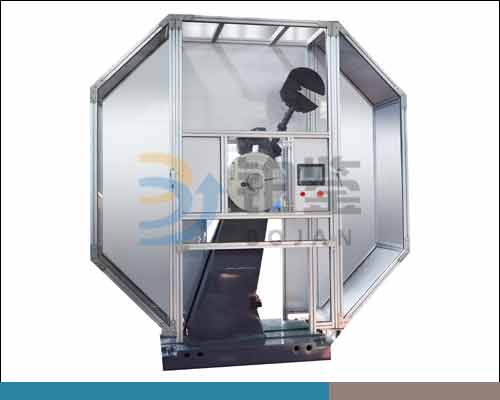
Digital pendulum impact tester

一.Features
The equipment adopts German Siemens PLC as the lower computer control, the digital display control cabinet as the upper computer control, the upper computer program adopts VB programming, RS232 communication mode, completes the data exchange and command transmission of the upper and lower position machine, fully utilizes the powerful functions of the PC to carry out the data processing, report processing, etc.The inner-controlled high-precision rotary encoder is used to obtain the real-time position of the pendulum and obtain the impact absorption work. It has the characteristics of reliable, stable and accurate data.
二.Technical indicators:
1. Impact energy 300J
2. Pendulum torque 160.7695NM
3. Scale dial scale 0 ~ 300J, each small grid division value 2J;
4. Impact blade radius 2 ~ 2.5mm;
5. Distance from pendulum center to impact point (test center): 800 mm
6. Pendulum pre-angle 150°
7. Impact speed 5±0.5 m/S
8. Sample support span 40 mm
9. Sample bearing end arc radius 1-1.5 mm
10. Sample support support surface inclination 0°
11. Impact knife arc radius 2-2.5 mm
12. The angle between the two inclined faces of the impact knife 30°
13. Impact blade thickness: 16 mm
14. Specimen specifications: 10 × 10 × 55 mm, 10 × 7.5 × 55 mm 10 × 5 × 55 mm
15. The computer displays the minimum resolution value of 0.1J
16. Test machine weight: about 800KG
17. Box size (length, width and height) about:1100*940*1700mm
18. Power supply: Three-phase four-wire system 50HZ, 380V, 550W (Power can be customized according to your requirements)
Test operation The touch screen panel has a total of pendulum, impact, unloading, and arranging, etc., which can be used for the operation of pendulum, impact, unloading, arranging, and recycling.
三.Equipment standard configuration:
1, the host 1pc
a) Special measurement and control software (independent intellectual property rights) 1 set
b) touch screen 1 set
c) Micro printer 1pc
2, 300J pendulum 1 set
3, span adjustment template, sample centering block, 1 set
4, fully enclosed safety shield 1 set
5, stay moving: specifications, S = 30. 1
6, hex wrench: specifications, S = 12. 1
7, ground angle screw: specifications, M16 × 250. 4 sets
8, the jaws (including the bracket): (already installed on the host) 1 pay
四.Technical Information
1. Product instruction manual 1
2, product qualification certificate 1
3. Product verification certificate 1
4, equipment foundation map (including electronic version) 1
5, packing list, 1
Fully meet your technical requirements
Name | Requirement | Chinese company parameters |
Purpose of purchase | Replacement of obsolete | |
Application | It is intended for testing the impact strength ferrous metals (toughness) | This machine is used to measure the impact toughness value of various metal materials and the impact resistance of metal materials under dynamic load.(toughness) |
Operating conditions | In door | In door |
+15 ° с to +35 ° с | +15 ° с to +40 ° с | |
Accuracy | 0.5 | 0.5 |
Min. Hammer impact energy | 13.5 j | 13.5J |
Max. Hammer impact energy | 300 j | 300J |
Pendulum speed | 5± 0.5 m/s | 5± 0.5 m/s |
Accuracy of scale graduation (from max. Impact energy) | No more 0.5 % | ≤±0.5% |
The number of tests per day | 20 pcs. | Fully compliant |
Control circuit | Software blocking, limiting and protecting, preventing inadmissible modes of equipment operation, emergencies. | Fully compliant.And the device not only has a safety protection pin protection device in the control circuit, but also is equipped with a fully enclosed protective cover, which completely protects the personal safety, is safer and more reliable to use, and has a beautiful appearance. |
Scope of supply | Pendulum hammer - 1 pc. | Pendulum hammer - 1 pc.(300J) |
Adjustment plates l = 40 mm - 1 pc. | Adjustment plates l = 40 mm - 1 pc. | |
Template (plate with the selected center): l = 40 mm (u or v shaped cut) | Template (plate with the selected center): l = 40 mm (u or v shaped cut) | |
Safety fence - 1 set. | Safety fence - 1 set. | |
Hexagon for adjusting s = 12 mm - 1 pc. | Hexagon for adjusting s = 14 mm - 1 pc. | |
For fastening the pendulum hammer, an anchor bolt m 16x250 mm - 4 pcs. | For fastening the pendulum hammer, an anchor bolt m 16x250 mm - 4 pcs. | |
Microprocessor unit with touch screen - 1 pc. | Microprocessor unit with touch screen - 1 pc. | |
Micro printer-1 pc | ||
Dedicated test software-1 pc | ||
Spare parts | For 2 years | Please tell me what you want to express |
Documentation | Transportation and installation guide | Transportation and installation guide |
Assembly drawing | Assembly drawing | |
Instruction manual | Instruction manual | |
Safety and maintenance note | Safety and maintenance note | |
Certificate of initial certification | Certificate of initial certification | |
Video of instructions | ||
Services | Commissioning, training | Once the item is received, we will send you a video of the device's instructions for use. If you need our service staff to attend your on-site training, you will need to increase costs. |
Warranty period | 2 years | 2 years |
Accuracy and operation according to the standards | En 10045/1-/2 iso-r422 – astm/e23/93a | En 10045/1-/2 iso-r422 – astm/e23/93a |
Previous:Impact testing machine

